|
This page will instruct you on how to set up everything I have operational
on this site. The page is currently being redesigned to be easier to read
and hopefully understand, and less mindless ramble like it was previously.
Also I plan to include lots of pretty pictures, because as we all know,
visual aids make it easier to learn things, or at the very least, it gives
you something to look at in case you don't want to read, but still want to
pretend you did.
Scrolling Marquee Sign
You know what I'm talking about. Those scrolling light displays. Well,
I'm going to build one, and if you want to tag along, so can you. This
project is for novelty purposes and experience more than a means to save
money on a professionally built marquee sign. For the same amount of money
you can get something that works out of the box with a warranty and probably
a self-contained programmable interface. But what fun would all that be?
First things first. Know something about electronics and TTL logic circuity.
I THOUGHT I knew before I started. I learned a lot along the way. I've
had to basically start from scratch 3 times as I encountered various
obstacles, and I'm not finished yet, but I think I've crossed all the major
hurdles now and all that remains is the timeconsuming monotonous work.
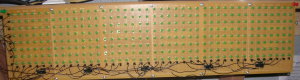
First gather your supplies. You'll need a computer with a parallel port (a
linux system if you want to use my code verbatim, although it should be
portable with minimal fuss). I've purchased pre-etched boards that
convienently have 8 columns to work with. Each character is 8x8, so you'll
need 64 LEDs, probably all the same color, but its your sign, so do as
you please. You'll also need one 74LS273 Octal D-Flipflop IC and 8
switching transistors (2n2222 work). Add a 7805 voltage regulator and a
power supply that pushes at least 8 volts DC (a 9V battery can suffice for
a while). The design is modular. To extend the sign, you simply append
another 8x8 array board, minus the regulator.
The theory behind this sign is as follows. Each LED has an anode and a
cathode. Each LED in a column shares the cathode and each LED in a row
shares the anode. The 8 data lines from the parallel port connect to the 8
anode rows. Each cathode column is connected to the collector of a
transistor. These transistors are triggered by the D flipflop which is
wired to ripple a single bit through the 8 bits of that circuit. This way,
one and only one transistor is active at any time. The computer will output
whatever LED's need to be lit on the current column, wait a few microseconds,
turn off the LED's, pulse the 74ls273 then turn on the LED's for the next
column. This process repeats until the end of the sign is reached. The
cycle then repeats. An 8 character sign should be able to refresh about 120
times per second easily.
To create a monochrome effect, some LED's can be lit only every other refresh.
This will result in a LED that appears to be only half the brightness of
the others. Several levels of brightness may be achieved by this effect, but
if a more broad range is required multiple bits per LED will be required and
filtered through resistors to get the desired brightness.
To add additional characters, simply carry over the 8 data lines, the output
from the 8th flipflop, the +/- lines and the clock line. The regulator can
handle up to 1A of current which will be plenty for a sign of any concievable
length since only the flipflops need to be powered at any one time. All the
LED's are powered by the computer itself.
For multiple colors instead of just shades of a single color, take a red,
green, and blue LED, wedge them together, then center a spacer above them.
cover the board except for the spacers so you see the combined light only.
You then need to provide each individual LED the desired shade, instead of
only one LED per position. This means you'll need 3 bits of information for
each position instead of only 1. This isn't bad considering you can get
64 colors easily from those 3 bits. Your mileage may vary.
Take a sharp object and scratch off the contacts on the top and bottom of the
board so that each column is electrically separate from the others
To be continued......
Source Code Now Available
I am now making the source code for the lamp, doorbell, and stepper motor
available for download. You may make any use of this source code you like,
but if you make changes that are useful, please send me updates so I can
incorporate them back into my system as well.
None of the source is complete. Its in a working state, but there's still
a lot I want to do with it, so it will be updated from time to time as I
incorporate those changes.
As for functionality, I only make the following statement: It works for me.
You're welcome to ask questions if you have problems, and I will try to help
if I can. Also, before you even THINK about hooking up some homemade circut
to your computer, consider the fact that its very possible to fry computer
components, especially with the parallel port circuts, if you don't construct
them properly. Therefore, it would be wise not to hook your lamp circut up
to your new PII 400. 486's can be had for less than $30 these days. All
you need is a network card and you can control all the devices from remate.
This software has been written to take advantage of a network.
The basic requirements are a linux system, a joystick port (for the doorbell),
and a parallel port (for the lamp & motor). You also need kernel support
for the joystick port and parallel port. Kernel versions 2.2 and up have
joystick support built in, but I know 2.0.30 did not and needed to be added
separately as a module. I leave you to figure out your configuration issues.
Doorbell Files:
Client
Server
Lamp Files:
Client
Server
Barcode Files: (Warning, these are a MESS and don't even work right. :)
Text based client
CGI program to generate the Inventory page
Program to generate the individual inventory tracking log
Comments(0)
|